Project Portable Wi-Fi
TL;DR
Google Project Fi data-only SIM cards will work with the T-Mobile 4G HotSpot Z64; here is the one I bought.
Click here to jump to the tutorial on how to set it up.
The Rest of the Story
Google’s Project Fi is a very cost effective cell phone service. If you have not heard of Project Fi, you can checkout more about it here. The short of it is this: You can get a phone plan for $20 a month. Now that is just for phone service, after that it’s $10 per gigabyte of mobile data that you use.
But it gets better, you can have up to 9 data-only devices on your plan, which are completely free to have, and you only pay for the mobile data that you use.
For example, I have a Nexus 7 tablet (2013, 4G) with Lineage OS. At the time I bought it, I paid extra for the LTE version of the tablet, but never ended up using the LTE capability. Now I have a Project Fi, data-only SIM in the tablet, and whenever I need data on the tablet, it’s there!
Most of the time I keep the tablet in airplane mode, and use Wi-Fi, but if I need mobile data for my tablet, it’s as simple as taking the tablet out of airplane mode.
Project Fi has a decent list of compatible devices, and as of the time of this writing, they are:
- Nexus 7 - K009 (2013 US LTE)*
- Nexus 9 - 0P82300 (2014 US LTE)
- iPad Air 2 - Model A1567 (2014)
- iPad Mini 4 - Model A1550 (2015)
- iPad Pro - Model A1652 (2015)
- Galaxy Tab S - Model SM-T807V (2015)*
- Pixel 2 (North American and Telestra versions)
- Pixel 2 XL (North American and Telestra versions)
- Pixel Model G-2PW4100 (North American version)
- Pixel XL Model G-2PW2100 (North American version)
- LG G7 ThinQ (Unlocked North American versions sold by retailers)
- LG V35 ThinQ (Unlocked North American versions sold by retailers)
- Moto G6 (Unlocked North American versions sold by retailers)
- Android One Moto X4 (North American versions)
- Nexus 5X Model LGH790 (North American version)
- Nexus 6P Model H1511 (North American version)
- Nexus 6 Model XT1103 (North American version)
Here is where I started to experiment. Would it be possible to use a portable Wi-Fi device with a data-only SIM? After seeing the quote below, I decide to try the following idea out.
Data-only SIMs may work with devices that aren’t on our list. Devices need to be unlocked and work with T-Mobile (GSM radio). You can order a data-only SIM and test it out. However, we may not be able to help activate or troubleshoot these other devices.
Project Fi and the Portable Wi-Fi
Turns out Project Fi will work with a T-Mobile 4G HotSpot Z64; here is the one I bought.
Note: You will need a SIM card adapter for the Project Fi data-only SIM chip to work in the device.
Once you have your HotSpot Z64, simply put the SIM in, and turn on the device. You will see “Project Fi” display on the device, but once you connect to the device via Wi-Fi, you’ll notice that you cannot connect to the Internet. Not a problem, you’ll just need to add the Project Fi Access Point Name (APN) to the device settings, and here’s how.
First, connect to the portable Wi-Fi hotspot’s SSID. There is a button labeled “WPS”. Press that button twice in order to see the SSID and password to use when connecting to the portable Wi-Fi hotspot.


Once connected, open up your Firefox web browser, and navigate to: http://192.168.0.1. Then enter the default password: admin.

Note: You may want to change the default password. Just a good habit to get into.
Now it’s time to create a Project Fi APN:
Add a New Profile
- Click on “Settings”, then “Network Settings”
- Under the “APN” section, you’ll see “Mode”; set that to “Manual”
- Click on “Add New”
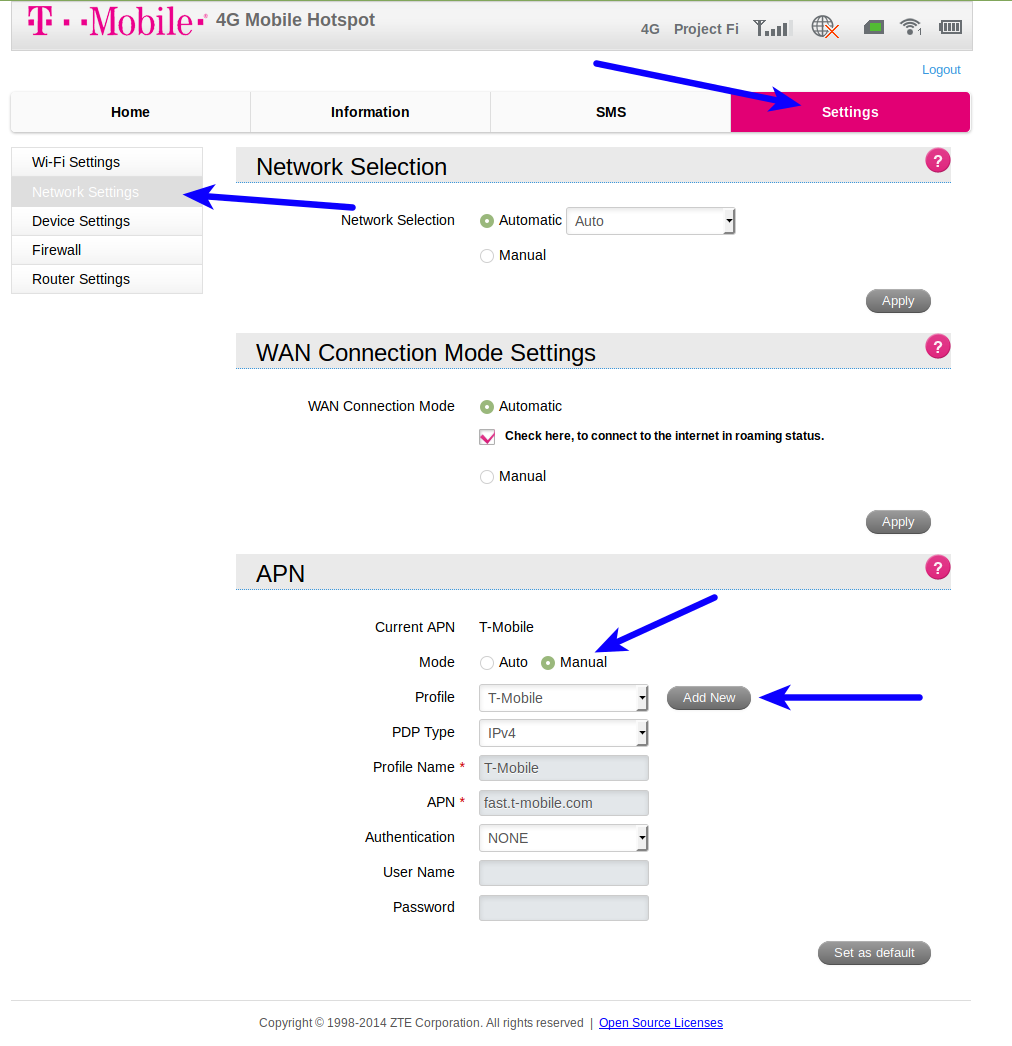
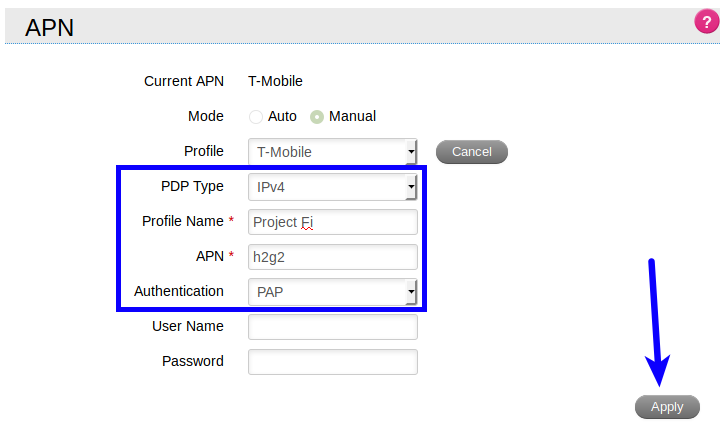
- Copy the settings from the screenshot below, and the click “Apply”
- PDP Type: IPv4
- Profile Name: Project Fi
- APN: h2g2
- Authentication: PAP
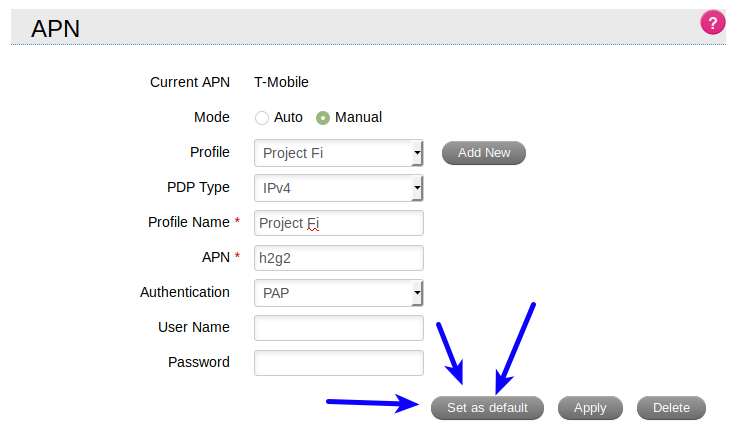
- This step is important: Now that you have created a Project Fi profile, you must now click “Set as default” for the profile to take effect
That’s it! :-) You now have a pay-as-you-go Wi-Fi Hotspot with Project Fi coverage!
Hope this is helpful. Feel free to leave comments or questions below.
End of Line.